Sunday, November 22, 2020

Bake 2.8: Foccacia

Paul Hollywood graced the technical challenge with a yummy bake Focaccia! I fell down a rabbit hole of Paul Hollywood baking videos which is highly suggested if you have a few spare moments. I am not sure my kneading is up to snuff but it turned out great. 

Ingredients
40 ml olive oil + some for the counter and proving/baking tin
500 g white bread flour
360 ml cool water
10 g salt
10 g instant yeast
Dried oregano or rosemary and flaked sea salt to finish

Lightly oil a square container or pan to use for proving. 

Tip the flour into a large mixing bowl, add the yeast to one side of the bowl, and the salt to the other side. 

Add 3/4 of the water and 40 ml of the olive oil, turning the mixture around with your fingers. Continue to slowly add the water, you may not need all of it. The dough is very soft, and wetter than a standard bread dough. 

Coat the work surface with some  olive oil, tip the dough onto it and begin to knead. Knead 5-10 minutes, work through the initial stage of it being wet, try to avoid adding more flour as it should be wet and sticky, use a bench scraper if needed Eventually it will form a soft, smooth skin. 

When the dough feels soft and elastic, put it in the oiled container. Cover and allow to rise until doubled. 

Line a baking tray with parchment and drizzle with olive oil. I used a pastry brush to spread it evenly. You can use a quarter sheet pan or a 9x13 if that is what you have. I used a dark colored non-stick 9x13 pan.

Tip the dough out onto the baking tray/pan and gently stretch to fit the tray. Cover and allow to prove until doubled in size and the dough springs back when poked (gently of course). 

Heat the oven to 425 degrees. Using your fingers to make deep dimples in the dough, pushing all the way to the bottom. Drizzle with olive oil and sprinkle with oregano and sea salt. Bake for 15 minutes. When tapping the bottom of the focaccia you will hear a hollow sound. The top of mine was not browning so I popped the grill on for 2 minutes once we hit the 15 minutes to get a nice golden brown. Drizzle the top with additional olive oil if desired and cool on a wire rack. 


Wednesday, November 18, 2020

Bake 2.7 Sausage Bread

For their signature bake, the bakers were asked to bake a free formed flavored loaf (not using a tin) in 3 ¼ hours. Okay swell. Now we have been eating more keto recently which means low carb. No, this doesn't make sense when carbs are my primary source of self care, however, this makes for a logical bread choice, MEAT BREAD. So I called up my mom and asked her for the recipe for Sausage Bread. I realize this may not be something you all remember from your childhood years but I do. 

Here is the recipe for posterity: 


I am going to suggest a couple of alterations to the recipe for greater bread baking success. First, cut the flour down to 2 1/2 cups all purpose and 1/2 cup whole wheat. When adding the flour, put it all in, none of this 'add the whole wheat after' business...  it needs to hydrate and getting it in there will help with the hydration. 

You can take or leave the onion, in our house we are minimal on the onion so I left it out. 

If you are keen on cheese, a healthy handful of parmesan in with the sausage brings a lovely salt forward without being too cheese heavy. 

Lastly, his folding method is a no-go. Growing up, my mom would roll it like cinnamon bread and bake it in a loaf tin. This is not how the recipe called for it to be baked. The recipe is wrong. Due to the stiffness of the dough, 'gently folding' in the sausage is a no-go. If baking free form, roll it up in there and tuck the ends under and call it good. Or do the loaf pan method. I didn't do either and while delicious, the outside sausage was over cooked to my liking, and the inside was right. 

Enjoy! 


I am telling you, great with a slather of butter, very great to make the classic egg in a hole, and very very great to make french toast. This bread is perfect for the french toast at my bakery that we fondly call Le Porc Toast.

Thursday, November 12, 2020

Bonus: Apple Cider Cake Donuts

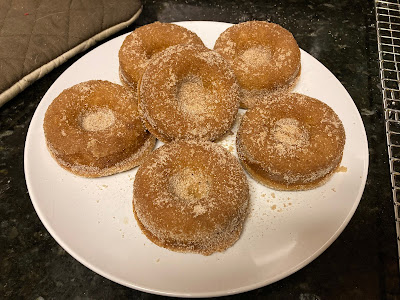
This is serious. This is the first donut making of my baking career. I purchased a donut pan. Someone should tell the donut pan label makers that the image of a yeasted donut on a pan specifically for non yeasted cake donuts is silly at best. A few tweaks to the recipe I found and clearly I overfilled so there is no discernable hole, but no one complained about that! I will aim for a hole next time... maybe. 

Ingredients 
1 1/2 cups apple cider
2 cups all purpose flour
1 teaspoon baking soda
3/4 teaspoon baking powder
1 teaspoon ground cinnamon
1/4 teaspoon nutmeg
1/4 teaspoon cardamom 
1/2 teaspoon salt
2 tablespoons butter, melted and cooled
1 large egg
1/2 cup brown sugar
1/2 cup milk, scalded, at room temperature
1 teaspoon vanilla extract

Topping
1 cup sugar
3/4 teaspoon cinnamon
5 tablespoons melted butter
1 tablespoon of reserved reduced apple cider

First, reduce that apple cider. Put it in a saucepan and simmer on low heat until it is 1/2 cup. I checked every 5 minutes after the first 10 minutes. I poured it into a pyrex to measure and then back into the saucepan to keep going. It was about 25 minutes to reach the 1/2 cup. Reserve 1 tablespoon to use in the topping and set the remainder aside to cool.

Preheat the oven to 350 degrees. Prep your donut pan(s) with baking spray. This recipe makes 12 donuts, if you only have 1 pan, bake the first 6, then rinse the pan, dry the pan, respray the pan and bake the second round. 

Whisk the flour, baking soda, baking powder, spices and salt together and set aside. 

Whisk the melted butter, egg, brown sugar, milk, and vanilla extract together. Pour into the dry ingredients, add the reduced apple cider, and whisk everything together until smooth and combined. Batter is slightly thicker than a muffin batter would be. 

Fill your donut pan 1/2 full. As you can see in the pictures below, I overfilled :-) If you run into the wife, ask her about how I overfilled the eclairs in baking class on our honeymoon. You can spoon the batter in, but it is much easier to put the batter in a pastry bag or plastic bag and pipe it in. 

Bake for 10-12 minutes, until the edges and tops are lightly browned. Test by poking with your finger, they should bounce back. Cool for 2-3 minutes in pan before transferring to the cooling rack.

To coat, dunk both sides of the donut in the melted butter mixed with the reserved cider, then dunk in the cinnamon sugar mixture. Best warm, so good. Enjoy! 

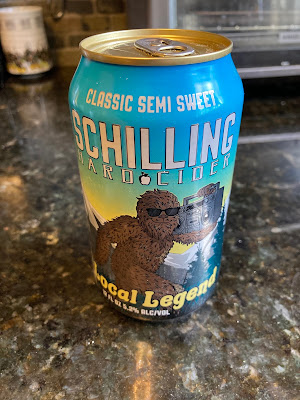
I used hard cider but any cider of your preference works.


Tuesday, November 3, 2020

Bonus: The Last Pumpkin Muffin Recipe You Will Ever Need

I love pumpkin, not just the pumpkin spice, but the actual pumpkin. I enjoy the spices too but so much of the craze for pumpkin spice has no actual pumpkin involved. Pumpkin beer? Mostly just about the spices. Pumpkin Spice Latte? No pumpkin in sight! 

So when the pumpkins roll into town I get a bunch of sugar pie pumpkins (best type for baking), roast them, puree their lovely insides, and bake! If you would like to roast your own, cut them in half and clean them out, put them cut side down on a baking tray lined with parchment, roast in a 375 degree oven for about 40-50 minutes. It really depends on their size. The outside will get very dark and when you poke it, it will indent and be very soft. Alternatively, canned pumpkin works too. 

The toddler loves these muffins, we made them mini for optimal popping goodness.

Ingredients
1 3/4 cups all purpose flour
1 cup sugar
1/2 cup brown sugar
1 tsp baking soda
1 tsp salt
2 tsp cinnamon
1/4 tsp allspice
1/4 tsp nutmeg
1/4 tsp ginger
2 eggs
1 3/4 cups pureed pumpkin (or a 15 ounce can)
1/2 cup coconut oil - melt and cool to ensure mixability
1 tsp vanilla extract
Optional: 1/2 cup mini chocolate chips

Preheat the oven to 375 degrees and prep a muffin tin. If making 12 muffins, you can use paper liners, or coat with baking spray. If making minis, coat with baking spray. 

Whisk the flour, sugars, baking soda, salt, and spices together and set aside.

Whisk the eggs, pumpkin puree, coconut oil, and vanilla. Add the wet and dry until just mixed. If using, add mini chips now.

Fill your muffin tins, until they are nearly full. This recipe domes very nicely so while it will feel that they were overfilled, it really will be okay. I use a 1 tablespoon cookie scoop to make the minis and it is just the right amount. 

Bake the regular size for 20-22 minutes, until a toothpick comes out clean. Bake the mini size for 10-12 minutes, until a toothpick comes out clean. 

Enjoy!

Yes, they look full, that is okay!


Toddler snack heaven is about to be served!

Tuesday, October 27, 2020

Bonus: THE BEST Funfetti Layer Cake

It is not every day you turn 10 years old. This is the prime time for a cake cram jammed full of sprinkles both inside and out. We decorated with pusheen and pokemon at the request of the birthday girls but you are welcome to decorate in any style that fits your birthday person.

Ingredients
3 2/3 cups all purpose flour
1 teaspoon baking powder
1 teaspoon baking soda
1 teaspoon salt
1 1/2 cups softened (room temperature) butter
1 3/4 cup granulated sugar
4 large eggs
2 large egg whites
2 teaspoons almond extract
1 1/2 cups buttermilk
3/4 cup rainbow sprinkles

Preheat the oven to 350 degrees, grease (you know I love the baking spray with flour) three 9 inch round cake pans and set aside.

Whisk the flour, baking powder, baking soda, and salt in a large bowl and set aside. Cream the butter, add the sugar and beat on high for a full 5 minutes in a mixer, or with your mega strong arm. Scrape down the bowl as needed. Reduce mixer speed and add the eggs one at a time (not the egg whites yet!). Add the almond extract. Reduce mixer speed to low and add the flour mixture, alternating with the buttermilk until just barely incorporated. In a separate bowl, whisk the two egg whites until soft peaks. Gently fold into the cake batter. Gently fold in all sprinkles. Divide evenly into the three pans. Bake for 24-28 minutes until a toothpick comes out clean. Allow to cool while making your cake soak and frosting. 

Cake Soak
1/2 cup milk
1 teaspoon vanilla or almond extract, both are delish

Mix and set aside.

Buttercream Frosting
1 1/2 cups softened (room temperature) butter
6 cups powdered sugar
1/3 cup heavy cream
2 teaspoons vanilla extract
1/2 teaspoon salt
Plus all the rest of the sprinkles you need for garnish!

Cream the butter in the mixer on high for 2-3 minutes. Add the remaining ingredients and mix on high for 3-4 minutes. Check consistency, add more powdered sugar or cream as needed to get the perfect cake coating ratio. 

Assembly time! 
Stack the first cake with a dollop of frosting to hold it to the cake stand or plate. coat with 1/3 of the milk mixture. Top with frosting, continue until all three are stacked. Frost the outside if you desire. I did a crumb coat, popped it in the fridge to firm up, and then did a second coat and rolled that in sprinkles using a sheet tray with sides to contain the joy. While tempted to coat the top as well, we left it free for pusheen/pokemon/party time. 


Cake of sprinkles? YES Cake of candy? YESSS 

Enjoy!

Thursday, October 15, 2020

Bonus: Toddler Bites (Vegetable Pancakes, PBH Snack Bites, Vegetable Banana Muffins)

We have a toddler in the house and there is always a need for toddler friendly snacks. Here are a few that we bake up often for the kiddo because he loves them!

Vegetable Pancakes

Use a blender to mix 1 banana, 1 egg, 2 tablespoons flour, 1/2 teaspoon baking powder and then your choice of either 1 1/2 cups raw spinach, 1/2 cup of cooked pumpkin, or 1/2 cup cooked sweet potato.

Once blended, spoon onto a buttered griddle and cook through. I use a cookie scoop so they are all about the same size and who doesn't love a mini pancake.

PBH Snack Bites

Melt 1/2 cup peanut butter and 1/2 cup honey in the microwave for 30 seconds, stir, then heat again for 20 seconds. Toss with 4 cups cheerios until well coated. Spoon into mounds on waxed paper to cool. These can be made with almond butter too if your home (or your kiddos school) is peanut free.

Vegetable Banana Muffins

Ingredients
2 ripe bananas, mashed
1 shredded zucchini
1 shredded carrot
1/2 cup unsweetened applesauce
1/4 cup melted butter
2 eggs
1 teaspoon vanilla
1 1/2 cups white whole wheat or regular flour (we use what we have)
1 cup sugar
1 teaspoon salt
1/2 teaspoon baking powder
1/2 teaspoon baking soda
1/2 teaspoon nutmeg
1 teaspoon cinnamon
1/2 cup frozen blueberries (we use them if we have them)

Preheat the oven to 350 degrees. Line or spray with baking spray a 12 cup muffin pan and set aside. Mash the bananas, mix with the shredded veggies, applesauce and butter. Mix in the eggs and vanilla. In a separate bowl mix the dry ingredients. Gently mix the dry into the wet until there are a few streaks of flour left. Mix in the blueberries if using. Divide between the muffin cups and bake for about 30 minutes. These can also be made as mini muffins, bake shorter of course about 12 minutes until a toothpick comes out clean. 

YUM!


and a batch with blueberries! 


Thursday, October 8, 2020

Bake 2.5: Tarte Au Citron

For our technical challenge, a classic French lemon tart.  I love a lemon tart. I love a lemon bar. I love a lemon pound cake... I just love lemon.  

Ingredients
1 1/4 cups all purpose flour
1/2 cup powdered sugar
1/4 teaspoon salt
1/2 cup cold butter, in small cubes
1 large egg
1/2 teaspoon vanilla

2 large eggs plus 2 egg yolks
3/4 cup granulated sugar
1 tablespoon lemon zest
1/2 cup freshly squeezed lemon juice
2 tablespoons heavy cream
1/2 cup butter, cut into small pieces


Process the flour, sugar, and salt in the bowl of a food processor or using a pastry cutter. Add butter and pulse until the mixture resembles coarse meal. Add the egg and vanilla and pulse until it just begins to clump.

Turn out onto a lightly floured surface, gather into a ball, and press into a disc. Wrap with plastic and put in the fridge for at least 30 minutes.

When ready, roll out into an 11 inch round, then place gently into the 9 inch tart tin. Trim edges, wrap in plastic and place in the freezer for at least 30 minutes.

Preheat the oven to 375 degrees, take a piece of parchment and crumple into a ball a few times to help it be less stiff, then press tightly into the tart shell, filling the middle with pie weights/beans/rice, whatever you have. Bake for 20 minutes, then remove the parchment/weights, and bake an additional 10 minutes.

Set the shell aside to cool and make the lemon filling.

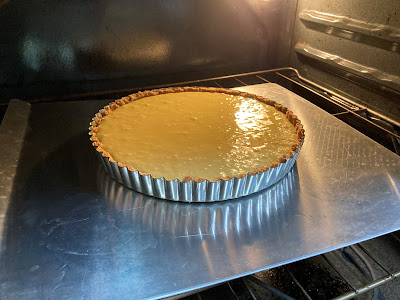
In a medium heatproof bowl, place eggs, sugar, lemon zest, lemon juice, and heavy cream, and whisk to combine. Place over a bain-marie and cook while whisking until thickened. You are looking to reach a temperature of 170 degrees. Remove from the heat and strain immediately through a mesh strainer. Then whisk the butter into the curd a little at a time. Once whisked in, place in the fridge to cool slightly. 

Once cooled slightly, fill and level the curd in the tart shell, refrigerate 4 hours or until set, before serving. SO YUM!


Back in the (baking) saddle!

Goodness, covid took over and then a series of other events led to making things work to get through... and baking took a back seat.  Stay t...