Tuesday, July 28, 2020

Bake 12b: French Toast Bread Pudding with a Twist

I generally avoid bread pudding. I admit this is a texture issue as I don't like things that are soggy, or have an unpleasant texture, like cottage cheese. Just thinking about it is unpleasant. So I put on my big girl pants and thought through how to make a bread pudding for someone like me, who is not keen on the idea in the first place. 

Years ago I learned some secrets for french toast that greatly improve on the basic method and that had me thinking about how the wife and I once had french toast bread pudding at a tiny cafe that was in the same building at the A Book for All Seasons bookshop in Leavenworth, Washington. I love that bookstore. It is small but thoughtfully stocked and I can always find something I need. One may argue that I can do that in any bookstore but that is beside the point. Back to our bread pudding.

I started with a simple french toast bread pudding recipe, brioche with a custard mix and then added some buttery, brown sugary, nutty crunch. Add a dollop of very lightly seasoned whip cream and a drizzle of maple syrup, or just skip brunch and serve it as a dessert with a scoop of vanilla ice cream! 

Ingredients
1 loaf Brioche or Challah
8 large eggs
1 1/2 cups whipping cream 
1 1/2 cups whole milk
1 cup granulated sugar
1 tablespoon vanilla extract
2 tablespoons flour
1/2 teaspoon salt
1/2 teaspoon ground nutmeg

Topping
1/2 cup salted butter
3/4 cup packed dark brown sugar
3/4 cup chopped pecans (or other nuts of your preference)
1 teaspoon cinnamon

Prep a rectangular baking dish, 13x9 preferred with butter or baking spray with flour. Set out a large shallow pan to use for the water bath that your baking dish fits into, I use a roasting pan. 

Cut the bread into 3/4 inch thick slices. Arrange the slices in rows, leaning and overlapping as necessary, if serving to guests you want it to be pretty but otherwise just smoosh it in there. If you want to be extra fancy, use a braided brioche.

In a large bowl, beat the eggs (by hand or with an electric mixer) until light and slightly thicker, 2-4 minutes. Beat in the cream, milk, sugar, flour, vanilla, salt and nutmeg. Pour over the bread in the dish, making sure to pour between the slices of bread, and gently push down on the bread to soak up the custard. 

Combine the topping ingredients, cutting the butter into the other ingredients. I usually just use a fork but if you are feeling fancy you can get out a pastry cutter. Spread the mixture over the soaking bread, pushing some down between the slices. 

Cover and refrigerate allowing to soak, either overnight, or at least 1 hour. The bread will soak up all the custard if you give it the time. Otherwise it will seem like there is too much.

Preheat the oven to 350, Place in the center of the larger pan, adding hot water into the larger pan to come up the side of the baking dish. Bake 36-40 minutes. It will look puffy, golden brown, and when you touch the top it should feel spongy, not dry or crusty. 

Serve with a drizzle with maple syrup or add a dollop of whipped cream (1 cup whipping cream + 2 tablespoons powdered sugar + 1/2 teaspoon vanilla = lightly sweetened whip cream). I went for a drizzle of maple syrup and a sprinkle of powdered sugar so I didn't have to wait for the cream to whip. Our whole house just smelled SO GOOD.

Since there is no party happening here, I made a half batch and baked it up in a 9 inch square dish. If you are going to do the same, grab a small size brioche, or put the other half in the freezer for later use.


Sunday, July 26, 2020

Bonus: Super Easy Pizza Crust

I love pizza and when you need an easy meal it can be a go-to without going out. This pizza dough is really simple, mix it up, let it rise, make some pizzas. I will include a simple red sauce recipe but goodness this dough can be topped with anything. We went with cheese for the toddler and sausage and mushroom for the adults. 

Ingredients
1 1/4 cup warm water (as close to 110 as possible, don't go over or you will hurt the yeasts feelings)
1 packet active dry yeast (2 1/4 teaspoons if you have a jar of yeast)
1 tablespoon sugar
3 tablespoons olive oil
1 1/2 teaspoons salt
3 1/2 cups flour
cornmeal for the pizza peel

In the bowl of your stand mixer, or a large bowl if mixing by hand, blend the water, yeast and sugar. Allow to sit at least 5 minutes to activate the yeast. Add the remaining ingredients and knead until you have a smooth dough. 

Schmear your proving bucket or bowl with olive oil and put your dough in the bowl, covering with a lid or plastic wrap until doubled in size. 

Preheat the oven to 475 degrees. I use a baking steel to cook pizza (and bread) because we broke two pizza stones and I find them to be a bit too delicate. Allow it to heat up for a good 15 minutes so you know the steel/stone/cookie sheet are heated through. 

Punch down the dough and divide in half for 2 - 12 inch pizzas, or divide into more for individual size pizzas. Press out the dough into the shape of your choice... round is not the only shape for pizza! 

Sprinkle the pizza peel with cornmeal, if you don't have a pizza peel it works to use a flat cookie sheet too. Pop the dough onto the peel, sliding it around to ensure there is enough cornmeal, if not, pull up the sides and add more until your pizza slides freely. If you do this before you top the pizza then it will slide off without making a big mess. Top as you so desire, we did red sauce, sausage, mushrooms, mozzarella and a sprinkle of parmesan. You can top with anything you love. 

Pop it in the oven and cook it to your liking. 


Easy Pizza Sauce
1 28 oz can crushed tomatoes
1 6oz can tomato paste
2+ cloves of garlic
2 teaspoons basil
1 teaspoon oregano
1 teaspoon salt
Dash of crushed red pepper 

Start with the olive oil and garlic in a medium saucepan, once you can smell the garlic add the rest of the ingredients and cook at least 15 minutes at a simmer. That not only allows the flavors to meld but cures the tomatoes of their tinny flavor from the can. You can cook it upwards of 30 minutes if you want to leave it going while you finish your dough prep. This time I also left out the salt and used a bit of anchovies for extra umami. 

Wednesday, July 22, 2020

Bonus: Lemon Curd

Yesterday I shared a tart recipe that called for lemon curd. It is really easy to make your own and it is so much better than what you find in the store. It is brilliant in recipes or layered in cake or on sweet biscuits or just with a spoon out of the jar, no judgement here!

Ingredients
4 large egg yolks
2/3 cup sugar
1 tablespoon lemon zest
1/3 cup fresh lemon juice
6 tablespoons room temperature salted butter

In a double boiler on the stove, add a few inches of water and bring to a boil, reduce to a simmer. Once the water is at a simmer, add your yolks, sugar, zest and juice to the top and whisk until it is all blended. 

Continue whisking often until the mixture is thick and glossy, 8-10 minutes. If you find it is not thickening then turn up the heat slightly. Continue to whisk to ensure your eggs don't curdle. 

Once thickened, remove from the heat, and whisk in the butter. Transfer to a bowl or jar to cool. While cooling put a piece of plastic wrap on the surface so you don't get a curd skin (yuck!). As it cools it will continue to thicken. 

Keep that yummy jar in the fridge, it will be good for about 10 days but mine has never lasted that long! This time it went right into a tart so I didn't even take a picture, I will try to remember to take a picture next time so you can see how lovely it looks. 


Tuesday, July 21, 2020

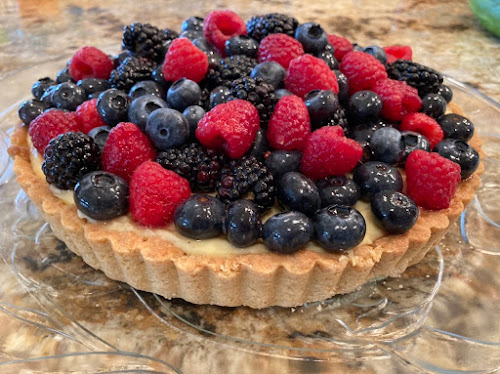
Bake 15a: Mixed Berry Tart

For the showstopper, the contestants were tasked with making both sweet and savory tartlets, 12 of each. As I lack tartlet pans, I decided to make one tart for sweet and one for savory.

First up, sweet! A mixed berry tart with fresh blueberries, raspberries, and blackberries, over a honey lemon pastry cream with a sweet tart crust with just a hint of lemon. We were set to have dinner with family and it felt like an ideal dessert to bring along, since they just harvested honey for the first time from their backyard hive and the summer berries were looking great at the store. 

Ingredients

Crust
1 1/4 cups flour
1/4 cup powdered sugar
zest of 1 lemon
1 stick cold cubed salted butter (1/2 cup)
1 egg yolk.(save the white for the filling)

Filling
1/2 cup lemon curd (recipe here)
3 eggs
1/4 cup flour
3 tablespoons corn starch
2 cups whole milk
1/3 cup honey
2 tablespoons salted butter

Topping
Berries of your choice, I used 1 cup each of blueberries, raspberries, and blackberries
Juice of 1/2 lemon
1/4 cup jelly of your choice

Preheat the oven to 400 degrees. Coat a tart pan (I used a 9" round) with cooking spray with flour. 

Make the crust first. Process the flour, sugar, and zest together. Add the butter and pulse until the mixture resembles coarse crumbs. Add in the egg yolk and pulse until the dough clumps together. Press the crust into the pan, using your fingers, and the outside of a measuring cup sprayed with nonstick cooking spray so it won't stick. Dock the bottom of the crust with a fork 5-7 times. Bake until golden brown, 13-15 minutes and allow to cool completely.

Next the filling. Whisk together lemon curd, reserved egg white from the crust, and eggs in a large bowl. Add the flour and cornstarch. In a medium saucepan, heat the milk and honey over medium to a summer. Add 1 cup of that heated milk to the egg mixture, whisking constantly. Then return the egg mixture to the saucepan, cooking over medium, until thick and bubbly. 3-5 minutes. Remove from the heat and add the butter, whisking until smooth. Pour into the cooled crust, covering with plastic wrap and chill at least 4 hours. 

While that chills, glaze your berries. Melt the lemon juice and jelly in a small saucepan or a microwave safe bowl. You can then either toss your berries in the glaze (be gentle with raspberries adding them last as they fall apart) or arrange your fruit on top of the tart and then brush with the glaze. I went with the toss method so I could pile on LOTS of berries.


Monday, July 20, 2020

Bake 11: Lemon Souffle Attempt #1

Technical time, and for the pudding episode, the bakers were challenged to bake a lemon souffle using Mary's recipe within 40 minutes. They rotated their start times so that the souffles could be judged straight away. 

You don't need to be afraid of a souffle, you can breath near them and no, you won't cause them to fall by walking near the oven. Even on GBBO the bakers seem nervous about them and I am not going to lie, I sat in front of the oven watching them fail. I definitely would have been in the bottom if I was being judged!

Here is the link to Mary's recipe, being the technical I followed it as closely as possible: Lemon Souffle

Silly Mary says 'Souffles can be fiddly to make, but if you follow this recipe carefully you'll get great results'. This is how I feel about that Mary:


Now we problem solve and try again! I pulled them out before they were finished because after they cracked they were going to spill over. So clearly I need to finish the baking time. The cracking was a different issue, so as they puffed up, rather than releasing from the sides and rising, they cracked across the tops to expand. In my research I found that there were two possible errors, that I didn't cook the pastry cream enough or that I over whipped the egg whites. I am guessing, based on the bowl residue from the egg whites that that is where they went wrong. The flavor (of the baked bits) was great and I had no lumping or separating of the final mixture. This assumption would be supported also by the mix being more liquid than I thought it was supposed to be when I was filling the ramekins. I will test that before making any other adjustments.

Stay tuned for attempt #2! 

Friday, July 17, 2020

Bake 12a: Apple and Blackberry Crumble

Time for the pudding showstopper! It involved three different types of puddings: crumble, bread, and suet. You will have to wait a little while for the suet pudding as I can't find suet so have gone to the internet to order some. In a few weeks when that comes and I have worked on the recipe then I will get it posted. In the meantime I will make the crumble and bread puddings!

First up, the crumble. I had a hankering for berries and we had apples so I did an apple and blackberry crumble with walnuts in the topping. You can use most any fruit for the filling and feel welcome to leave out the nuts, or trade them for nuts you prefer. Crumbles and crisps are a super easy summer dessert and love to be topped with a scoop of ice cream or in our case, brown sugar whipped cream.

Ingredients
Topping
1/2 cup chopped walnuts
1/2 cup oats
1/2 cup brown sugar
1/4 teaspoon cinnamon (or other spices of your choosing)
1/4 cup flour
6 tablespoons softened butter

Filling
3 tablespoons softened butter
1/2 cup brown sugar
1/2 teaspoon salt
1/2 pound apples (I used 5 smaller apples, I prefer to peel mine, then cut into small pieces)
12 ounces blackberries
*1 tablespoon corn starch can be added for particularly juicy fruits

Cream
1 cup whipping cream
1/4 cup brown sugar

Preheat the oven to 375 degrees and prep a square baking dish with butter or baking spray with flour. 
 
Mix the walnuts, oats, brown sugar, cinnamon and flour with a spoon. Smush in the softened butter until combined. I realize that 'smush' is not a technical term but just keep working the butter into the mixture until there are no streaks of dry mix that are still dry. Set aside to rest.

Bring butter and brown sugar and salt to a to a medium heat in a saucepan. Add the apples and cook until just beginning to soften, 5-6 minutes. Add the blackberries and cook an additional 3-5 minutes. If the fruit releases a lot of juice, add the cornstarch and continue to stir to ensure it is evenly distributed.

Pour into prepared dish, top with crumble. Bake for 15-18 minutes. 

While the crumble bakes, put your bowl and whisk or whisk attachment (if using a mixer) into the freezer for 5 minutes. Then whip the cream (start on a low speed and work up to high), adding the brown sugar midway through whipping. Pop in the fridge until the crumble is ready.

Allow crumble to cool slightly so you don't have a lava situation, and top with a generous scoop of whipped cream. 


Tuesday, July 14, 2020

Bonus: Sweet Sourdough Zucchini Bread

When it was time again to feed Bertha (my sourdough starter), I did some research about zucchini and sourdough  as we have a small mountain of zucchini from the garden that need to be consumed. Sourdough starter seems to work well in both zucchini and banana quick breads so off we went.

I think next time I would do butter instead of the vegetable oil in the batter and it would definitely work without the added chocolate chips and glaze but then it wouldn't be a sweet treat, just a regular treat. 

Ingredients
1 cup flour
1/2 cup sugar
1 teaspoon cinnamon
1/4 teaspoon salt
3/4 teaspoon baking soda
1 teaspoon baking powder
2 eggs
3/4 cup fed sourdough starter
1/4 cup vegetable oil
1 teaspoon vanilla
1 cup shredded zucchini (after shredding, lay on paper towels and sprinkle lightly with salt, allow to sit for 10 minutes at least and then press the moisture out with the paper towels before adding it to the mix)
1/2 cup mini chocolate chips
1/4 cup butter
1/4 cup brown sugar
2 teaspoons milk

Prep a loaf pan with butter or cooking spray with flour. Preheat the oven to 350 degrees.

Sift dry ingredients into a large bowl (flour, sugar, cinnamon, salt, baking soda, baking powder). In another bowl lightly beat eggs, stir in sourdough starter, vegetable oil and vanilla. Gently fold the wet ingredients into the flour mixture. When there are still flour streaks, fold in the zucchini and chocolate chips. 

Pour mixture into prepared loaf pan and back for 45-50 minutes.

While baking prepare the glaze by heating the butter, brown sugar, and milk in a small saucepan until smooth. Set aside. 

Remove the loaf when a toothpick comes out clean. While still in the pan, pour glaze over the loaf and allow to sit for at least 10 minutes.

Once cool turn out the loaf and enjoy! 


Sunday, July 12, 2020

Bake 10: Steamed Butterscotch Pudding

Episode 4, all about Pudding! Now, let's talk about pudding. The British folks have a long history with puddings of all kinds, and that did not seem to make it all the way across the pond, and the rest of the United States the northwest corner of Washington State where I grew up. This is the first hurtle where I feel confident in making pudding, once I figure out what all the words mean. 

In the signature, the bakers were asked to bake their own classic pudding, steamed or baked. Okay, swell. Yes, swell. Yup. Okay. SWELL. 

After much deliberation I have determined that we will jump right in and make a steamed butterscotch pudding. I love butterscotch, it is the more attractive but shy cousin of caramel. It makes a mean milkshake and is a great addition to a blonde brownie. 

I found some basic recipes and made a few adjustments. You will need a large stock pot or dutch oven to use for steaming your pud and don't worry if you don't have a lidded pudding mold, you can still make this!

Ingredients

Sauce 
1 cup dark brown sugar
1/2 cup salted butter
1 cup creme fraiche*
1 teaspoon vanilla

Pudding
1/2 cup salted butter, softened
1.2 cup sugar plus 2 tablespoons
2 eggs
1 teaspoon vanilla
1 2/3 cup all purpose flour
2 1/2 teaspoons baking powder
1/2 cup milk

Cream
1 cup heavy cream

*if you don't have creme fraiche you can substitute sour cream, or for a less 'sour' finish 3/4 cup sour cream and 1/4 cup heavy cream. Creme fraiche is the french version of sour cream and is more subtle. Who isn't more subtle than American's!

Prep your pud steamer first. I used our dutch oven, filled about 1/2 way with water, and a metal trivet on the bottom inside. You don't want the pudding mold resting on the bottom, no trivet? no problem, roll up some foil to make a ring and rest your pudding mold on that. Now, I mentioned that I don't have a pudding mold but I had a number of metal bowls. So I grabbed one that was small-medium sized, greased it up, and when it was time to steam, covered the top with plastic wrap, then foil, and tied baking string around the rim to ensure it was super secure. Rubber bands work well too. 

Bring the water to a boil and then reduce to a simmer.

Make the sauce by adding sauce ingredients to a medium saucepan and stir until the mixture comes to a boil. Turn down the heat and simmer for 3-5 minutes until thickened.

Pour 2/3 of the sauce into the prepared bowl. Put the rest in the fridge for later on.

Next mix the pudding by creaming the butter and sugar, adding the eggs one at a time, and adding the vanilla. Then adding the flour and baking powder (stir the baking powder into the flour to distribute evenly and avoid getting out another bowl). Add milk when streaks of flour remain, and fold until just combined.

Carefully spoon the batter on top of the sauce. Leveling the top and then covering the top. Lower into the simmering water, so the water comes up at least 1/2 way on the bowl/mold. Cook for 1 hour 20 minutes.

While steaming, whip the heavy cream until stiff peaks and set aside with the remaining sauce for topping.

To serve, run a knife around the edge of the bowl and turn out onto a large plate or shallow wide bowl. As long as it has a lip you will be good to go. I was worried about loosing the sauce so I used a shallow wide bowl which made serving rather challenging, a lipped plate is advised. 

Serve with a dollop of cream and a touch more sauce if desired. It is a rich pudding so it doesn't need much! 


Sunday, July 5, 2020

Bake 9b: Maritozzi con la panna

For our sweet roll, I waffled between making Hawaiian buns or maybe a hot cross bun, something I have not made before or maybe cinnamon rolls, just deciding what to do for the Signature and Showstoppers can take a little while! I decided to go with Maritozzi con la panna, a sweet bun that is filled with whipped cream and common in Rome. 

In undergraduate I spent a semester in Rome to study and doing so involved a lot of walking in order to taste the delicious food. My favorite class during that time was an Art/Architectural class where in the syllabus it listed the 'meeting location' for each class session. We then walked or moved about Rome to experience in person all the history as we learned it. These rolls are not to sweet, filled with fresh whipped cream, and perfect for having with breakfast or tea before a good walk.

Ingredients
1 lb all purpose flour
1/2 cup sugar
1/2 teaspoon salt
1 teaspoon vanilla
4 egg yolks (save the whites for glazing)
7 ounces of milk, scalded*
1 1/2 teaspoons yeast (one packet of active dry yeast)
1/4 cup powdered sugar 
2 cups whipping cream
A touch of powdered sugar for dusting

*To scald milk, heat it on the stove or in the microwave until 170 degrees, then allow to cool back down to about 110 before using. It does not mean to burn the milk! Scalding helps the yeast develop and you get a lighter fluffier bun. 

First prep the yeast by adding it to 1/4 cup of lukewarm water (110-115 degrees). Allow to sit until foamy. 

Sift the flour into the bowl of your stand mixer with the dough hook or a large bowl. Add the remaining ingredients (sugar, salt, vanilla, egg yolks, milk) and stir until you have a sticky smooth dough. If using the stand mixer, continue to knead for about 10 minutes. If by hand then knead until a smooth dough has formed.

Transfer to a large container or bowl to prove until doubled in size, nearly 2 hours for me.

Line two baking sheets with parchment or silpat. Lightly oil hands with vegetable or another light oil. Form the dough into small balls (ping pong or golf ball size) and place on the baking sheet. Cover with cling wrap (I spray with cooking spray to ensure it doesn't stick)... and be gentle and loose as you cover them. Allow to prove an additional hour until near doubled in size. 

Preheat the oven to 350 degrees. Using your egg whites set aside from the dough, brush the buns gently, but fully. Bake for 20 minutes. Then allow to cool

While cooling, pop your whisk attachment and bowl in the freezer for 5 minutes. Then whip your cream and 1/4 cup powdered sugar until you have moderate peaks. You can also add a dash of vanilla, and I added a pinch of salt as well. 

To assemble, slice the top of the bun, pipe cream through the middle. Dust with powdered sugar. 


Friday, July 3, 2020

Bake 9a: Rolled Garlic Bread

For the showstopper, the bakers were asked to bake 12 sweet rolls and 12 savoury rolls in 6 hours. 

For the savoury portion I am going to take the idea of cinnamon rolls (yum!) and the pepperoni rolls from Old Chicago (anyone?) and make a rolled garlic bread. I used a basic bread roll dough, and then amended with a garlic butter filling. They are a touch more work than your grocery store garlic bread but goodness they are worth it! I made 12 but they were large, so next time I will cut them into 18 and see if the size is more reasonable.

Ingredients

Dough
1 cup whole milk, room temperature
2 1/4 teaspoons (1 packet) active dry yeast
4  cup all purpose flour
1/4 cup granulated sugar
2 teaspoons salt
2 large eggs
3 tablespoons butter, room temperature

Filling
1/2 cup softened butter
4 tablespoons chopped garlic
1/2 teaspoon chili powder
1/4 cup shredded parmesan
1 tablespoon chopped parsley

Optional (and delicious) topping
4  tablespoons butter
2 tablespoons chopped garlic
1 teaspoon granulated garlic
1 tablespoon chopped fresh parsley

Combine the milk, yeast, and sugar in a small bowl and allow to sit until frothy and activated, about 10 minutes. If your yeast doesn't do anything... it is dead. I am sorry. You need to get new yeast. I keep a jar of active dry yeast in the fridge as it saves better there.

In the stand mixer, with the dough hook, combine the milk mixture and all the remaining dough ingredients until it comes together. Knead on high for 8-10 minutes, until you have a smooth, soft dough. If completing by hand, the mix with a wooden spoon in a large bowl, then knead until you have a soft smooth dough that passes a windowpane test.

Oil a bowl and place the dough in the bowl, roll it about so it is lightly covered with oil, cover with plastic wrap or a lid and prove until it has doubled in size, about 1 hour. I use a lidded proving bucket for all my bread so I can see most clearly when it has doubled.

Deflate the dough and transfer to a lightly oiled work surface. Roll into a large rectangle about 1/4 inch thick. The thinner the dough, the more spirals of garlic goodness! Mix the filling ingredients in a small bowl and then spread across the rectangle, leaving one long edge clear. Roll into a tight log, pinching the end to ensure a good seal. Cut the log into 12 even pieces and place in a greased 9 by 13 pan. Spray a piece of plastic wrap with cooking spray (so it won't stick) and cover the rolls. Allow them to prove for at least 1 hour until they have doubled in size. 

Preheat the oven to 350 degrees near the end of the proving time, setting the rack at the lower middle position. Bake 30 minutes until the rolls have puffed up and are nicely browned. Allow to cool while you make the topping.

In a small saucepan, melt the butter, adding the remaining ingredients and cooking for 3-5 minutes until the garlic is soft. Brush over the buns. 

Enjoy! 


Thursday, July 2, 2020

Bonus: Baked Oatmeal

We often prep meals ahead in our home because it is easier for us to stay on track and waste less food. For breakfast I often make an oatmeal bake (or an egg bake) that will last us a few days and both are so easy! Here is our go-to baked oatmeal recipe that is 6 servings:

Ingredients

Base
1 1/4 cup rolled oats 
3 tablespoons light brown sugar
1/2 teaspoon salt
1 2/3 cup milk (use what kind you have)
1 large egg
1 teaspoon vanilla
*12 ounces frozen mixed berries, thawed

Topping
1/3 cup rolled oats
1/4 cup light brown sugar
2 tablespoons melted butter
1 tablespoon flour (any kind works)
dash of cinnamon
dash of salt

*I have been known to substitute the berries for whatever is on hand... 1 1/2 cups of diced apples, or peaches are especially fantastic. I zap the berries in the toxic microwave for 60 seconds and then use them, with their juices. for apples or peaches I do cook them with a dash of water in a saucepan for 10-15 minutes to give them a head start

Preheat the oven to 350 degrees and prepare your dish with butter or baking spray. I use a pyrex that has a lid so I can toss it in the fridge for the few days we eat it.

Stir together the milk, egg, and vanilla in a medium bowl. Add the oats, sugar, and salt. Pour into your prepared dish. Spread the berries over the top of the oat-milk mixture.

For the topping, stir together the oats, sugar, butter, flour, cinnamon and salt. Sprinkle evenly-ish across the top of the berries. Bake until just set and browned, 45-50 minutes. Let cool on a rack for 10-15 minutes if eating immediately. You can serve with a dollop of yogurt or a dash of milk. I just eat it as is. Sometimes (to the bane of the wife) I even eat it cold. 


*You could also do a tropical version if you run out of berries but have the Costco frozen morning mix which is strawberries, mango, pineapple and peaches. For that one I trade 1/2 teaspoon almond extract for the vanilla in the base, and switch up the topping by leaving out the cinnamon and adding 1/4 cup shredded coconut.


Back in the (baking) saddle!

Goodness, covid took over and then a series of other events led to making things work to get through... and baking took a back seat.  Stay t...